05/11/13
RELEASE:
REGOLATORE
AUTOMATICO DELLA
VELOCITA’ DI UN
INVERTER
DEFINIZIONE
Il dispositivo regola la velocità di un
INVERTER in funzione del rilevamento di
un segnale di ingresso (VI) che rappresenta la condizione di lavoro (sforzo) di
un motore principale.
UTILIZZAZIONE
L’E 186 varia la velocità dell’INVERTER
per diminuire il materiale che alimenta il
molino affinché quest’ultimo non si “ingolfi” (esempio fig.1).
CARATTERISTICHE E
REGOLAZIONI
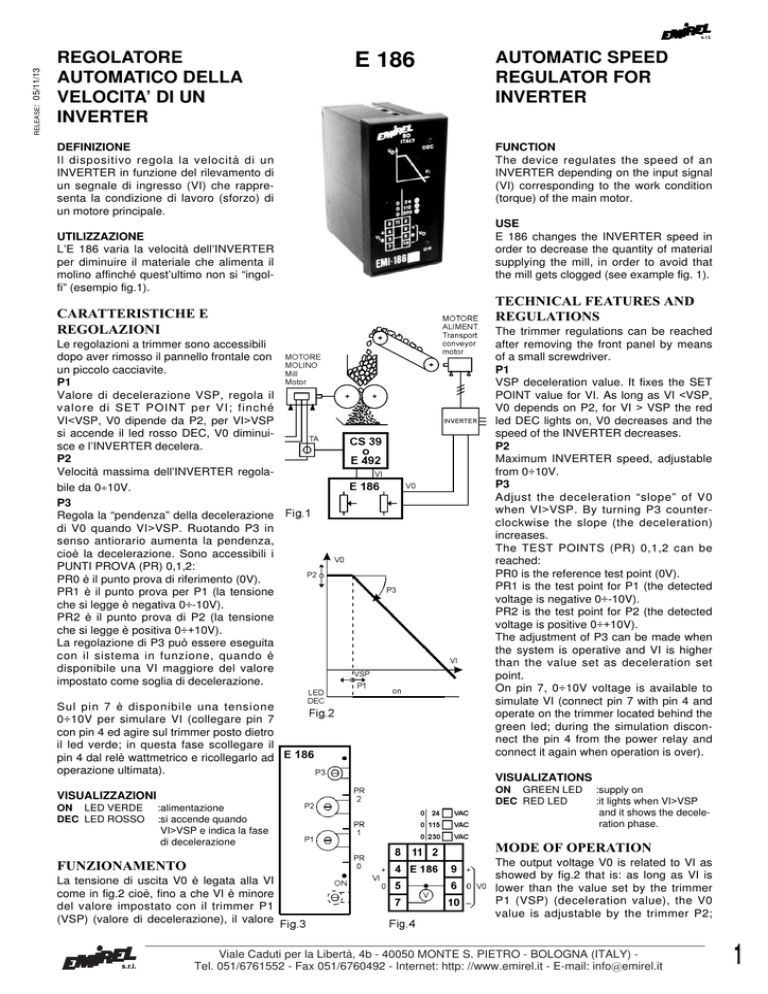
Le regolazioni a trimmer sono accessibili
dopo aver rimosso il pannello frontale con
un piccolo cacciavite.
P1
Valore di decelerazione VSP, regola il
valore di SET POINT per VI; finché
VI<VSP, V0 dipende da P2, per VI>VSP
si accende il led rosso DEC, V0 diminuisce e l’INVERTER decelera.
P2
Velocità massima dell’INVERTER regolabile da 0÷10V.
P3
Regola la “pendenza” della decelerazione
di V0 quando VI>VSP. Ruotando P3 in
senso antiorario aumenta la pendenza,
cioè la decelerazione. Sono accessibili i
PUNTI PROVA (PR) 0,1,2:
PR0 è il punto prova di riferimento (0V).
PR1 è il punto prova per P1 (la tensione
che si legge è negativa 0÷-10V).
PR2 è il punto prova di P2 (la tensione
che si legge è positiva 0÷+10V).
La regolazione di P3 può essere eseguita
con il sistema in funzione, quando è
disponibile una VI maggiore del valore
impostato come soglia di decelerazione.
Sul pin 7 è disponibile una tensione
0÷10V per simulare VI (collegare pin 7
con pin 4 ed agire sul trimmer posto dietro
il led verde; in questa fase scollegare il
pin 4 dal relè wattmetrico e ricollegarlo ad
operazione ultimata).
VISUALIZZAZIONI
ON LED VERDE
DEC LED ROSSO
:alimentazione
:si accende quando
VI>VSP e indica la fase
di decelerazione
FUNZIONAMENTO
La tensione di uscita V0 è legata alla VI
come in fig.2 cioè, fino a che VI è minore
del valore impostato con il trimmer P1
(VSP) (valore di decelerazione), il valore
E 186
AUTOMATIC SPEED
REGULATOR FOR
INVERTER
FUNCTION
The device regulates the speed of an
INVERTER depending on the input signal
(VI) corresponding to the work condition
(torque) of the main motor.
USE
E 186 changes the INVERTER speed in
order to decrease the quantity of material
supplying the mill, in order to avoid that
the mill gets clogged (see example fig. 1).
TECHNICAL FEATURES AND
REGULATIONS
The trimmer regulations can be reached
after removing the front panel by means
of a small screwdriver.
P1
VSP deceleration value. It fixes the SET
POINT value for VI. As long as VI <VSP,
V0 depends on P2, for VI > VSP the red
led DEC lights on, V0 decreases and the
speed of the INVERTER decreases.
P2
Maximum INVERTER speed, adjustable
from 0÷10V.
P3
Adjust the deceleration “slope” of V0
when VI>VSP. By turning P3 counterclockwise the slope (the deceleration)
increases.
The TEST POINTS (PR) 0,1,2 can be
reached:
PR0 is the reference test point (0V).
PR1 is the test point for P1 (the detected
voltage is negative 0÷-10V).
PR2 is the test point for P2 (the detected
voltage is positive 0÷+10V).
The adjustment of P3 can be made when
the system is operative and VI is higher
than the value set as deceleration set
point.
On pin 7, 0÷10V voltage is available to
simulate VI (connect pin 7 with pin 4 and
operate on the trimmer located behind the
green led; during the simulation disconnect the pin 4 from the power relay and
connect it again when operation is over).
VISUALIZATIONS
ON GREEN LED
DEC RED LED
:supply on
:it lights when VI>VSP
and it shows the deceleration phase.
MODE OF OPERATION
The output voltage V0 is related to VI as
showed by fig.2 that is: as long as VI is
lower than the value set by the trimmer
P1 (VSP) (deceleration value), the V0
value is adjustable by the trimmer P2;
Viale Caduti per la Libertà, 4b - 40050 MONTE S. PIETRO - BOLOGNA (ITALY) Tel. 051/6761552 - Fax 051/6760492 - Internet: http: //www.emirel.it - E-mail: [email protected]
1
di V0 è regolabile con il trimmer P2; quando VI supera (VSP) il led rosso si accende e la tensione di uscita V0 comincia a
decrescere fino ad annullarsi e diventare
eventualmente anche negativa a seconda
della regolazione di P3.
La dinamica di VI e V0: è 0÷10V.
La tensione di ingresso VI può essere
ricavata dalla tensione analogica di un
E 492 (relè wattmetrico). I relè associati
alle 2 soglie possono essere utilizzati per
segnalazioni visive o sonore o per fermare la macchina (vedere fig.5).
La tensione di ingresso VI può essere
ricavata dal convertitore di potenza CS 39
di cui si utilizza l’uscita in tensione (vedere fig.6).
TARATURA
Portare P1 al max.
Portare la macchina in condizione di massimo sforzo e diminuire P1 finché non si
accende il led DEC.
Diminuire lo sforzo della macchina in
modo che il led DEC sia spento, regolare
P2 per avere la massima velocità
dell’INVERTER.
Portare la macchina sotto sforzo (led DEC
acceso) e regolare P3 per avere una maggiore o minore decelerazione dell’INVERTER (in senso antiorario aumenta la pendenza cioè la decelerazione).
Si consiglia di fare la taratura di VI sulla
macchina (in opera); è comunque disponibile (al pin 7) una tensione da 0÷10V che
permette di simulare VI. Quando il pin 7 è
collegato al pin 4 ovviamente il wattmetrico deve essere scollegato. Al termine il
pin 7 deve restare libero ed il pin 4 deve
essere ricollegato al wattmetrico.
when VI is greater than VSP the led red
lights and the output voltage V0 starts
decreasing until becoming null, and eventually becomes negative, according to the
regulation of P3.
The range of VI and V0 is: 0÷10V.
The input voltage VI can be the analog
output of E 492 (power relay). The two
internal relays of E 492 may be used for
signalisations (light or siren) or to stop the
machine (see fig.5).
The input voltage VI can be given also by
a power transducer CS 39 using the output voltage 0÷10V (see fig.6).
NOTA 1
In fig.5 e fig.6 sono utilizzati anche i moduli
CS 24 che realizzano l’isolamento galvanico. Senza l’isolamento galvanico la LOGICA
dell’INVERTER non sarebbe isolata dalla
rete di potenza.
REMARK 1
Fig.5 and 6 show the application of two
modules CS 24 necessary for the galvanic
separation. Without the galvanic separation
the LOGIC of the INVERTER should not be
separated from the power net.
SETTING
Turn P1 to the max.
Put the machine in the condition of maximum load and decrease P1 until the led
DEC lights on.
Decrease the load of the machine in order
to get the led DEC off, adjust P2 in order
to get the maximum speed of the INVERTER.
Increase the load of the machine (led
DEC lighted) and adjust P3 in view of getting a higher or lower deceleration of the
INVERTER (in counterclockwise the slope
(deceleration) increases).
It is suggested to set VI with the machine
in operation; any way on pin 7 it is available the voltage 0÷10V used to simulate
VI.
When the pin 7 is connected to the pin 4,
the power relay must be disconnected.
When the setting operation is over, the
pin 7 must remain free and the pin 4 must
be connected again to the power relay.
INSTALLATION: see fig.5 or fig.6.
INSTALLAZIONE:si veda fig.5 o fig.6.
INGRESSO
Pin 4-5 : 0÷10V(+ su pin 4) Ring 100kΩ
USCITA
Pin 9-6 :0÷10V (+ su pin 9) (1mA max)
Pin 10-6 :0÷10V (- su pin 10) (1mA max)
ALIMENTAZIONE
2 VA - 50-60 Hz Tolleranza: -10%÷+6%
2-11 : 115 o 230Vac (24Vac a richiesta)
TEMP. DI FUNZIONAMENTO: 0÷70 °C
DIMENSIONI: 48x96x90 mm con innesto
per zoccolo undecal.
Accessori disponibili a richiesta :
E 171: ganci per montaggio da incasso.
E 172: zoccolo femm. undecal per DIN.
M13A:protezione plexiglas piombabile
IP54.
E 346: molle di sostegno antisfilamento.
Dima di Foratura: 45x92 mm
PESO: kg 0,300
COLORE: nero
INPUT
Pin 4-5 : 0÷10V(+ on pin 4) Input resistance 100kΩ
OUTPUT
Pin 9-6 :0÷10V (+ on pin 9) (1mA max)
Pin 10-6 :0÷10V (- on pin 10) (1mA max)
SUPPLY
2 VA - 50-60 Hz Tolerance: -10%÷+6%
2-11 : 115 o 230Vac (24Vac on request)
WORKING TEMPERATURE: 0÷70 °C
SIZE: 48x96x90 mm undecal male base.
Accessories available on request;
E 171 hooks for flush mounting;
E 172 undecal female base for DIN
M13A plexiglas protection IP 54-tight closure.
E 346 hold spring protecting from vibrations Template:45x92 mm
WEIGHT: kg 0,300
COLOUR: black
2
Viale Caduti per la Libertà, 4b - 40050 MONTE S. PIETRO - BOLOGNA (ITALY)
Tel. 051/6761552 - Fax 051/6760492 - Internet: http: //www.emirel.it - E-mail: [email protected]

