DOMANDE FREQUENTI
FREQUENTLY ASKED QUESTIONS
I -
Dopo un lungo periodo di pausa (stand-by), perché l’apparecchio non si accende?
Risposta: a causa del lungo fermo, si creano delle interferenze. Spegnere e riaccendere il dispositivo
Perché il Computer, tramite USB, riesce ad accedere al File presente su hard-disk, ma il Lettore
non lo riproduce?
Controllare che la formattazione su hard-disk sia stata eseguita in FAT oppure FAT32.
Per la riproduzione dei File, infatti, non vi sono altri formati disponibili o possibili.
GB -After a long idling period (stand-by), why does the Device NOT turn on?
Because of the long idling period, interferences occur. In such case, turn-off and then turn-on the Device again.
How comes that the Computer, through USB, manages to get to a File situated on the harddisk, but the Device does NOT reproduce this File?
Check if the hard-disk formatting has correctly been effected in FAT or in FAT32.
To be noted, in fact, that for the File-reproduction there are NO OTHER formats available or possible.
HDD
CARATTERISTICHE TECNICHE • TECHNICAL FEATURES
I - Il lettore è compatibile con HD SATA di grandi capacità per memorizzare Film, musica e fotografie.
(Hard-Disk tipo SATA Max 750 GB)
Il Lettore è collegabile ad apparecchi Home-Theater, per l’intrattenimento a casa.
Il Lettore è utilizzabile come dispositivo esterno di memorizzazione (Hard-Disk dati)
Il Lettore è dotato di uscite multiple per il collegamento: TV / monitor VGA / amplificatori.
CAR PLAYER
GB - The Device is compatible with high-capacity SATA HD, for the memorization of films, musical tracks and
pictures (Hard-Disk SATA type 750 GB Max capacity)
The Device can be connected to Home-Theater-appliances, for home-entertainment.
The Device can be used as an external memorization unit (Data Hard-Disk).
The Device is equipped with multiple exits for the connection of: TV / VGA monitor and amplifiers.
120GB con / with FAT/FAT32
fino a / up to 750 GB
Audio: MP3, WAV, WMA
Video: MPEG 1/2, MPEG4, XVID, DivX
(*.mpg; *.mpeg; *.dat; *.avi; *.vob)
Sottotitolo/ Sub-Title:
SRT, SSA, ASS, SUB, ASS, PSB, TXT
Immagini: JPEG
1 SD/MMC card (Max. 2GB)
Video:
1 videocomposito / composit video
1.0Vp-p (75 Ohm) NTSC/PAL
1 VGA 640*480*60
Audio:
1 2.0Vp-p Stereo analogica (L&R) / stereo analogical (L&R)
1 coassiale digitale / digital coaxial
USB2.0 alta velocità per connessione PC
High speed USB2.0 for PC connection
480P / 576N
per auto/car-use
12 Volt
per casa/home-use 110/240V 50/60Hz
MANUALE ISTRUZIONI
INSTALLATION INSTRUCTIONS
VM 005
Phonocar S.p.A. - Via F.lli Cervi, 167/C - 42100 Reggio Emilia (Italy)
Tel. ++39 0522 941621 - Fax ++39 0522 942452
www.phonocar.com - e-mail:[email protected]
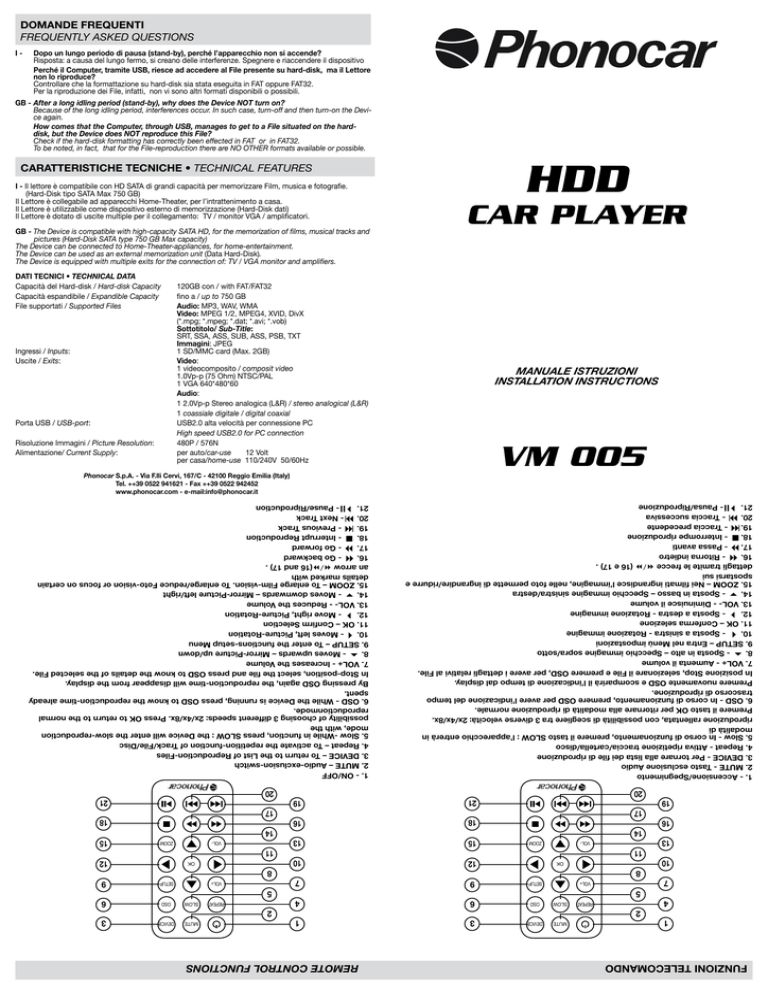
1. - Accensione/Spegnimento
2. MUTE - Tasto esclusione Audio
3. DEVICE - Per tornare alla lista dei file di riproduzione
4. Repeat - Attiva ripetizione traccia/cartella/disco
5. Slow - In corso di funzionamento, premere il tasto SLOW : l’apparecchio entrerà in
modalità di
riproduzione rallentata, con possibilità di scegliere tra 3 diverse velocità: 2x/4x/8x.
Premere il tasto OK per ritornare alla modalità di riproduzione normale.
6. OSD - In corso di funzionamento, premere OSD per avere l’indicazione del tempo
trascorso di riproduzione.
Premere nuovamente OSD e scomparirà il l’indicazione di tempo dal display.
In posizione Stop, selezionare il File e premere OSD, per avere i dettagli relativi al File.
7. VOL+ - Aumenta il volume
8. - Sposta in alto – Specchio immagine sopra/sotto
9. SETUP – Entra nel Menù impostazioni
10. - Sposta a sinistra - Rotazione immagine
11. OK – Conferma selezione
12. - Sposta a destra - Rotazione immagine
13. VOL- - Diminuisce il volume
14. - Sposta in basso – Specchio immagine sinistra/destra
15. ZOOM – Nei filmati ingrandisce l’immagine, nelle foto permette di ingrandire/ridurre e
spostarsi sui
dettagli tramite le frecce / (16 e 17) .
16. - Ritorna indietro
17. - Passa avanti
18. - Interrompe riproduzione
19. - Traccia precedente
20. - Traccia successiva
21.
- Pausa/Riproduzione
19
16
13
10
7
4
1
20
1. - ON/OFF
2. MUTE – Audio-exclusion-switch
3. DEVICE – To return to the List of Reproduction-Files
4. Repeat – To activate the repetition-function of Track/File/Disc
5. Slow -While in function, press SLOW : the Device will enter the slow-reproduction
mode, with the
possibility of choosing 3 different speeds: 2x/4x/8x. Press OK to return to the normal
reproductionmode.
6. OSD - While the Device is running, press OSD to know the reproduction-time already
spent.
By pressing OSD again, the reproduction-time will disappear from the display.
In Stop-position, select the file and press OSD to know the details of the selected File.
7. VOL+ - Increases the Volume
8. - Moves upwards – Mirror-Picture up/down
9. SETUP – To enter the functions-setup Menu
10. - Moves left, Picture-Rotation
11. OK – Confirm Selection
12. - Move right, Picture-Rotation
13. VOL- - Reduces the Volume
14. - Moves downwards – Mirror-Picture left/right
15. ZOOM – To enlarge Film-vision. To enlarge/reduce Foto-vision or focus on certain
details marked with
an arrow /(16 and 17) .
16. - Go backward
17. - Go forward
18. - Interrupt Reproduction
19. - Previous Track
20. - Next Track
21.
- Pause/Riproduction
21
17
19
18
16
14
VOL-
ZOOM
13
15
11
VOL+
SETUP
5
REPEAT
SLOW
OSD
2
MUTE
10
12
OK
8
DEVICE
DATI TECNICI • TECHNICAL DATA
Capacità del Hard-disk / Hard-disk Capacity
Capacità espandibile / Expandible Capacity File supportati / Supported Files
Ingressi / Inputs:
Uscite / Exits:
Porta USB / USB-port:
Risoluzione Immagini / Picture Resolution:
Alimentazione/ Current Supply:
7
9
4
6
3
FUNZIONI TELECOMANDO 1
20
21
17
18
14
VOL-
ZOOM
15
11
12
OK
8
VOL+
SETUP
5
REPEAT
SLOW
OSD
2
MUTE
REMOTE CONTROL FUNCTIONS
DEVICE
9
6
3
AVVERTENZE
CAUTIONS
• Non usare questo prodotto in ambienti molto caldi o molto umidi.
I Campi magnetici, in abbinamento con frequenze particolari, possono negativamente influenzare il trasferimento
dei dati.
• Non spostare o urtare il Riproduttore quando è in funzionamento.
• E’ necessario utilizzare il trasformatore in dotazione, in quanto altri tipi di trasformatori potrebbero dan
neggiare il Lettore.
• Occorre spegnere l’alimentazione del Lettore prima di collegarlo ad altre apparecchiature.
• Trattandosi di un apparecchio ad integrazione elevata, è normale che si vengano a creare elevate tempe
rature in fase di funzionamento. Ciò non deve preoccupare e non avrà ripercussioni sul prodotto stesso.
• Non spegnere/riaccendere, in rapida successione, poiché potrebbe danneggiarsi l’hard-disk.
NOTE DI UTILIZZO
• L’utilizzo su computer con sistema operativo Windows 98 è possibile dopo l’installazione del driver presente nel disco fornito nella dotazione.
• Non tutti i file multimediali sono riproducibili, occorre quindi selezionare il file corretto.
• Dopo aver acceso il lettore, occorre pazientare qualche istante, per dare il tempo al Lettore di caricare
i file.
• Non spegnere, ne scollegare il dispositivo durante il trasferimento dei files, onde evitare possibili danni ai
documenti rendendoli inaccessibili.
SOSTITUZIONE CON NUOVO HARD DISK
• Il nuovo Hard-disk non può essere diviso in più di 2 partizioni.
• In presenza di una grande capacità, è consigliabile utilizzare programmi professionali per creare le partizioni (Daemon tools, Alcohol 120%, etc)
• Impostare l’hard-disk SATA interno come Master.
• Se il dispositivo non è in grado di riprodurre i file sull’Hard Disk è necessario formattarlo. L’operazione può
essere effettuata anche nella modalità “formattazione veloce”.
• Do not use this Product in very hot or very humid environments.
Magnetic fields can, in combination with particular frequencies, negatively affect the data transfer
operation.
• Do not move or hit against the Device while in operation.
• It is advisable to use a Phonocar-transformer, in as far as other transformers could damage the Device.
• Before connecting the Device to other appliances, it is necessary to switch-off the current-supply.
• Considering that we are talking about a high-integration appliance, it is normal that the Device will develop
high temperatures while in use. There is no reason for you to worry, because this fact will have no negative
effect on the product itself.
• Do not switch ON/OFF rapidly in a row, as this could damage the hard-disk.
HINTS ON HOW TO USE THE APPLIANCE
• The Device can be used on Computers fitted with the Windows 98 operation-system, after having installed
the “driver” that can be found on the CD supplied with the Device.
• Not all Multimedia-Files can be reproduced, so that each time the specific file needs to be selected.
• Once the Device has been switched-on, please wait a few seconds so that the Device can charge the files.
• Do not switch-off or de-connect the Device during the files-transferring process, not to damage the docu
ments or avoid difficulties during access.
REPLACE HAND-DISK WITH A NEW ONE
• The Hard-Disk cannot be divided into more than 2 partitions.
• In the presence of high capacities, it is advisable to make use of professional partition-programmes
(Daemon tools, Alcohol 120% etc.).
• Set the internal SATA hard-disk as Master.
• Should the appliance not manage to reproduce the files onto the Hard-disk, disk-formatting will be
necessary, even in the mode “Quick formatting”
COLLEGAMENTI • CONNECTION-SCHEME
Uscita/Out
Audio/Video
Uscita/Out
VGA
FUNZIONI HARD DISK • HARD DISK FUNCTIONS
Uscita Audio Coaxiale Alimentazione
Digitale
Power
Coaxial Digital Output
Porta USB
per connessione PC
USB-Eingang für PCAnschluss
1
Sensore IR
IR Sensor
6
Connettore per sensore IR
esterno
Connector for external IR
Sensor
VOL
2
VOL
VGA
Dati/Data
Alimentazione/Power
5
Giallo / Yellow
Video
Porta SD Card* / SD Card port*
Bianco / White
Audio L
(SD CARD SIZE: MAX 2 GB)
Rosso / Red
Audio R
FUNZIONI
TRASFERIMENTO DATI
1. Collegare il dispositivo al proprio computer tramite il cavo USB in dotazione (porta USB)
NON COLLEGARE L’ ALIMENTAZIONE.
2. Il computer impiega qualche secondo per caricare i driver del dispositivo. Al termine della procedura
appare la finestra dell’Hard Disk.
3. Per accorciare i tempi di ricerca dei file, consigliamo suddividerli nelle 3 cartelle: “Music” (Musica),
“Photo” (Immagini) e “Movie” (Filmati).
4. ATTENZIONE: Eliminare la periferica da windows prima di scollegare il cavo usb perché l’ hard
disk si potrebbe danneggiare (rimozione sicura della periferica).
INSTALLAZIONE IN AUTO
1. Collegare il dispositivo al monitor tramite il cavo Audio/Video in dotazione.
2. Collegare il sensore remoto IR e posizionarlo in un punto che permetta la ricezione del segnale del
telecomando.
3. Collegare l’alimentazione tramite lo stabilizzatore di tensione fornito nella dotazione a +12 Volt sottochiave.
4. ATTENZIONE: Il dispositivo si accende nel momento del primo collegamento dell’alimentazione.
Successivamente si potrà accendere e spegnere tramite il telecomando.
INSTALLAZIONE IN CASA
1. Collegare il dispositivo tramite il cavo Audio/Video o la presa VGA al monitor.
2. Posizionare il dispositivo in un punto che permetta la ricezione del segnale del telecomando.
3. Collegare l’alimentazione tramite lo stabilizzatore di tensione fornito nella dotazione 110/240 Volt
4. ATTENZIONE: Il dispositivo si accende nel momento del primo collegamento dell’alimentazione.
Successivamente si potrà accendere e spegnere tramite il telecomando.
UTILIZZO
La prima volta che si accende il dispositivo, inizia la riproduzione del primo file in ordine alfabetico.
Successivamente la riproduzione riprende dall’ultima posizione interrotta (last position memory function).
Premendo il tasto DEVICE si torna alla lista dei file nella cartella di riproduzione.
Per tornare al menù/cartella precedente è necessario spostarsi sulla prima cartella in alto e premere il tasto
OK.
SETUP IMPOSTAZIONI GENERALI
Premendo il tasto SETUP si accede al menù.
Sullo schermo appariranno le seguenti descrizioni che potranno essere modificate tramite i tasti freccia e
confermate con il tasto OK
LINGUA OSD - Scelta del linguaggio del menù di SETUP
SCREEN SAVER - Attiva/Disattiva una schermata salvaschermo dopo alcuni secondi di inattività.
SPDIF output - Abilita/Disabilità modalità Audio SPDIF
LPCM Output - Modifica trasmissione LPCM
DEFAULT - Ripristina impostazioni di fabbrica
SETUP IMPOSTAZIONI VIDEO
Per modificare le impostazioni VIDEO premere prima il tasto SETUP poi il tasto freccia destra ()
Sullo schermo appariranno le seguenti descrizioni che potranno essere modificate tramite i tasti freccia e
confermate con il tasto OK
SCHERMO TV - Modifica il formato dell’immagine in base al monitor utilizzato: auto; 4:3PS; 4:3LB; 16:9
TIPO TV - Seleziona il segnale della sorgente: auto; NTSC; PAL
RESOLUTION - Impostare su INTERLACE quando si collega un monitor con ingresso video composi
to, VGA quando si collega un monitor con ingresso VGA (computer)
SLIDESHOW TIME - Seleziona il tempo di scorrimento nella visione delle immagini
SLIDESHOW MODE - Seleziona gli effetti di transizione nel passaggio tra un’immagine e la successiva
4
3
1. Sposta in alto - Specchio immagine sopra/sotto • Move upwards - up/down Mirror-Picture
2. VOL+ Aumenta il volume • Increases the Volume
3.
Pausa/Riproduzione • Pause/Riproduction
4. Sposta in basso / Specchio immagine sinistra / destra / Passa a VGA
Move downwards – left / right Mirror-Picture / VGA mode
5. Interrompe riproduzione • Interrupt Reproduction
6. VOL- Diminuisce il volume • Reduce Volume
FUNCTIONS
DATA-TRANSFER PROCESS
1. Connect the Device to your Computer, by using the supplied USB-cable (USB-port).
DO NOT CONNECT TO THE POWER-SUPPLY.
2. The computer will require some seconds to load the drivers of the Device. When the procedure has
been completed, the Hard-Disk-window will appear.
3. To reduce the searching-time of a File, we would recommend to create three different Folders: “Music”,
“Photo”, “Movie”.
4. ATTENTION: Always eliminate first the peripheral from Windows, and then take the USB-cable
away. If you do not observe this indication, the hard-disk could be damaged (certain elimination
of the peripheral).
INSTALLATION INTO THE CAR
1. Connect the Device to the Monitor, by using the Audio/Video-cable supplied with the Device.
2. Connect the remote IR-Sensor and position the sensor in such way to allow the remote-control signal
to be received.
3. Connect the current-supply, by using the Voltage-stabilizer supplied with the Device, to +12V under
key.
4. ATTENTION: The Device needs to be turned on, when the current-supply is connected for the
first time. Subsequently, the Device can be turned on/off by means of the remote-control unit.
INSTALLATION AT HOME
1. Connect the Device to the Monitor, by using the Audio/Video-cable or the VGA-socket.
2. Position the Device so that it can receive the signal coming from the remote-control unit.
3. Connect the current-supply, by using the Voltage-stabilizer supplied with the Device 110/240 Volt.
4. ATTENTION: The Device needs to be turned on, when the current-supply is connected for the
first time. Subsequently, the Device can be turned on/off by means of the remote-control unit.
USE of the DEVICE
By switching-on the Device for the first time, reproduction of the first file will start in alphabetical order.
In all other occasions, reproduction will start from the last position, where reproduction was stopped (last
position memory function).
By pressing the DEVICE-key, you will get the File-List inside the reproduction folder.
To return to the previous Menu/Folder, it is necessary to go to the first top folder and press OK.
SET-UP of GENERAL SETTINGS
By pressing the SET-UP-key, you will enter the Menu.
On the screen, the below mentioned descriptions will appear. These can be changed by means of the
arrow-keys and confirmed with the OK-key.
OSD LANGUAGE - Choose the SET-UP-menu language
SCREEN SAVER - Activates/Disactivates a screen-protecting mode, after a few idling seconds of the monitor
SPDIF OUTPUT - Activates/De-activates the Audio SPDIF-mode
LPCM OUTPUT - Changes the LPCM-transmission
DEFAULT - Re-activates the pre-determined factory-settings
SET-UP OF VIDEO-SETTINGS
To modify the VIDEO-settings, first press the SET-UP-key, then the right arrow-key ().
On the screen, the below mentioned descriptions will appear. These can be changed by means of the
arrow-keys and confirmed with the OK-key.
TV SCREEN - Changes the picture-format, in due relation with the used monitor: auto; 4:3PS; 4:3LB;
16:9
TV TYPE - Selects the source-signal: auto; NTSC; PAL
RESOLUTION - Choose INTERLACE when you connect a monitor with a composite video-input.
Choose VGA when you connect a monitor with a VGA-input (computer).

![Corona [modalità compatibilità]](http://s1.studylibit.com/store/data/006510629_1-23c75f60f0373eebfd1aae6c7d950f55-300x300.png)
