COMBISTOP 08
α°
Manuale di Istruzioni e montaggio Tipo 08
Montaggio
X
β°
0,5-1
1
10
X
9
2
8
3
3.1
4
H
7
1
5
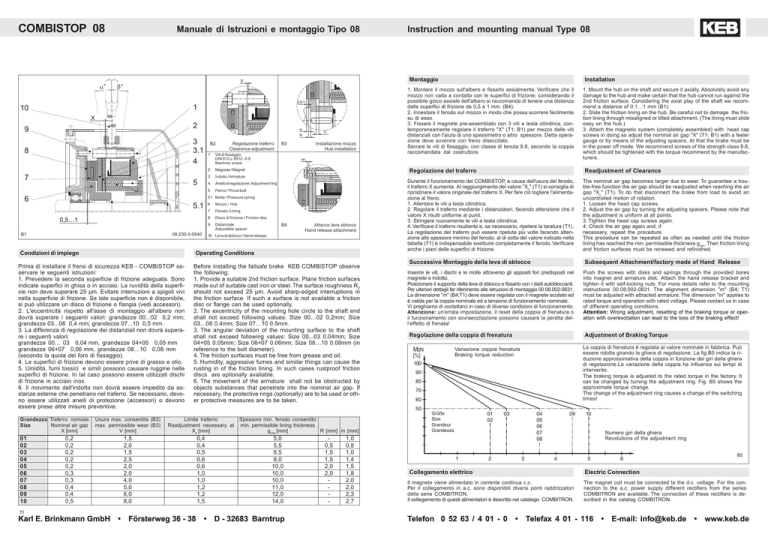
Regolazione traferro
Clearance adjustment
B3
Viti di fissaggio
DIN 912 u. 6912 - 8.8
Machine screw
2
Magnete / Magnet
3
Indotto / Armature
Installazione mozzo
Hub installation
5.1
Anello di regolazione / Adjustment ring
5
Perno / Thrust bolt
0,5…1
B1
08.230-3-0540
Condizioni di impiego
Ferodo / Lining
8
Disco di frizione / Friction disc
9
Distanziale
Adjustable spacer
B4
Attacco leva sblocco
Hand release attachment
10 Leva di sblocco / Hand release
Operating Conditions
Prima di installare il freno di sicurezza KEB - COMBISTOP osservare le seguenti istruzioni:
1. Prevedere la seconda superficie di frizione adeguata. Sono
indicate superfici in ghisa o in acciaio. La ruvidità della superficie non deve superare 25 µm. Evitare interruzioni a spigoli vivi
nella superficie di frizione. Se tale superficie non è disponibile,
si può utilizzare un disco di frizione o flangia (vedi accessori).
2. L'eccentricità rispetto all'asse di montaggio all'albero non
dovrà superare i seguenti valori: grandezze 00...02 0,2 mm;
grandezze 03...06 0,4 mm; grandezze 07...10 0,5 mm.
3. La differenza di regolazione dei distanziali non dovrà superare i seguenti valori:
grandezze 00… 03 0,04 mm, grandezze 04+05 0,05 mm
grandezze 06+07 0,06 mm, grandezze 08…10 0,08 mm
(secondo la quota del foro di fissaggio).
4. Le superfici di frizione devono essere prive di grasso e olio.
5. Umidità, fumi tossici e simili possono causare ruggine nelle
superfici di frizione. In tal caso possono essere utilizzati dischi
di frizione in acciaio inox.
6. Il movimento dell'indotto non dovrà essere impedito da sostanze esterne che penetrano nel traferro. Se necessario, devono essere utilizzati anelli di protezione (accessori) o devono
essere prese altre misure preventive.
Grandezza Traferro nomiale
Size
Nominal air gap
X [mm]
Mozzo / Hub
7
Before installing the failsafe brake KEB COMBISTOP observe
the following:
1. Provide a suitable 2nd friction surface. Plane friction surfaces
made out of suitable cast iron or steel. The surface roughness RZ
should not exceed 25 µm. Avoid sharp-edged interruptions in
the friction surface. If such a surface is not available a friction
disc or flange can be used optionally.
2. The excentricity of the mounting hole circle to the shaft end
shall not exceed following values: Size 00…02 0,2mm; Size
03…06 0.4mm; Size 07…10 0.5mm.
3. The angular deviation of the mounting surface to the shaft
shall not exceed following values: Size 00...03 0.04mm; Size
04+05 0.05mm; Size 06+07 0.06mm; Size 08…10 0.08mm (in
reference to the bolt diameter).
4. The friction surfaces must be free from grease and oil.
5. Humidity, aggressive fumes and similar things can cause the
rusting in of the friction lining. In such cases rustproof friction
discs are optionally available.
6. The movement of the armature shall not be obstructed by
objects substances that penetrate into the nominal air gap. If
necessary, the protective rings (optionally) are to be used or other protective measures are to be taken.
Successivo Montaggio della leva di sblocco
Regolazione della coppia di frenatura
Limite traferro
Readjustment necessary at
Xn [mm]
Spessore min. ferodo consentito
min. permissible lining thickness
gmin [mm]
R [mm] m [mm]
1,5
2,0
1,5
2,5
2,0
2,0
4,0
5,0
6,0
8,0
0,4
0,4
0,5
0,6
0,6
1,0
1,0
1,2
1,2
1,5
5,0
5,5
6,5
8,0
10,0
10,0
10,0
11,0
12,0
14,0
•
D - 32683 Barntrup
0,5
1,5
1,5
2,0
2,0
-
1,0
0,8
1,0
1,4
1,5
1,8
2,0
2,0
2,3
2,7
La coppia di frenatura è regolata al valore nominale in fabbrica. Può
essere ridotta girando la ghiera di regolazione. La fig.B5 indica la riduzione approssimativa della coppia in funzione dei giri della ghiera
di regolazione.La variazione della coppia ha influenza sui tempi di
intervento.
The braking torque is adjusted to the rated torque in the factory. It
can be changed by turning the adjustment ring. Fig. B5 shows the
approximate torque change.
The change of the adjustment ring causes a change of the switching
times!
100
90
80
70
60
01
02
Größe
Size
Grandeur
Grandezza
1
Push the screws with disks and springs through the provided bores
into magnet and armature disk. Attach the hand release bracket and
tighten it with self-locking nuts. For more details refer to the mounting
instructions 00.08.002-0831. The alignment dimension "m" (B4; T1)
must be adjusted with attracted armature. The dimension "m" applies to
rated torque and operation with rated voltage. Please contact us in case
of different operating conditions.
Attention: Wrong adjustment, resetting of the braking torque or operation with overexcitation can lead to the loss of the braking effect!
Adjustment of Braking Torque
Variazione coppia frenatura
Braking torque reduction
[%]
The nominal air gap becomes larger due to wear. To guarantee a trouble-free function the air gap should be readjusted when reaching the air
gap "Xn" (T1). To do that disconnect the brake from load to avoid an
uncontrolled motion of rotation.
1. Loosen the head cap screws.
2. Adjust the air gap by turning the adjusting spacers. Please note that
the adjustment is uniform at all points.
3. Tighten the head cap screws again.
4. Check the air gap again and, if
necessary, repeat the procedure.
This procedure can be repeated as often as needed until the friction
lining has reached the min. permissible thickness gmin. Then friction lining
and friction surfaces must be renewed and refinished.
Subsequent Attachment/factory made of Hand Release
Inserire le viti, i dischi e le molle attraverso gli appositi fori predisposti nel
magnete e indotto.
Posizionare il supporto della leva di sblocco e fissarlo con i dadi autobloccanti.
Per ulteriori dettagli far riferimento alle istruzioni di montaggio 00.08.002-0831.
La dimensione "m" (B4;T1) deve essere regolata con il magnete eccitato ed
è valida per la coppia nominale ed a tensione di funzionamento nominale.
Vi preghiamo di contattarci in caso di diverse condizioni di funzionamento.
Attenzione: un’errata impostazione, il reset della coppia di frenatura o
il funzionamento con sovraeccitazione possono causare la perdita dell’effetto di frenata!
M2N
1. Mount the hub on the shaft and secure it axially. Absolutely avoid any
damage to the hub and make certain that the hub cannot run against the
2nd friction surface. Considering the axial play of the shaft we recommend a distance of 0.1…1 mm (B1).
2. Slide the friction lining on the hub. Be careful not to damage the friction lining through misaligned or tilted attachment. (The lining must slide
easy on the hub.)
3. Attach the magnetic system (completely assembled) with head cap
screws in doing so adjust the nominal air gap "X" (T1; B1) with a feeler
gauge or by means of the adjusting spacers. At that the brake must be
in the power off mode. We recommend screws of the strength class 8.8,
which should be tightened with the torque recommend by the manufacturers.
Readjustment of Clearance
Durante il funzionamento del COMBISTOP, a causa dell'usura del ferodo,
il traferro X aumenta. Al raggiungimento del valore "Xn" (T1) si consiglia di
ripristinare il valore originale del traferro X. Per fare ciò togliere l'alimentazione al freno.
1. Allentare le viti a testa cilindrica.
2. Regolare il traferro mediante i distanziatori, facendo attenzione che il
valore X risulti uniforme ai punti.
3. Stringere nuovamente le viti a testa cilindrica.
4. Verificare il traferro risultante e, se necessario, ripetere la taratura (T1).
La regolazione del traferro può essere ripetuta più volte facendo attenzione allo spessore minimo del ferodo; al di sotto del valore indicato nella
tabella (T1) è indispensabile sostituire completamente il ferodo. Verificare
anche i piani delle superfici di frizione.
50
Usura max. consentita (B3)
max. permissible wear (B3)
V [mm]
0,2
0,2
0,2
0,2
0,2
0,3
0,3
0,4
0,4
0,5
1. Montare il mozzo sull'albero e fissarlo assialmente. Verificare che il
mozzo non vada a contatto con le superfici di frizione; considerando il
possibile gioco assiale dell'albero si raccomanda di tenere una distanza
dalle superfici di frizione da 0,5 a 1 mm. (B4).
2. Innestare il ferodo sul mozzo in modo che possa scorrere facilmente
su di esso.
3. Fissare il magnete pre-assemblato con 3 viti a testa cilindrica, contemporaneamente regolare il traferro "X" (T1; B1) per mezzo delle viti
distanziali con l'aiuto di uno spessimetro o altro spessore. Detta operazione deve avvenire con freno diseccitato.
Serrare le viti di fissaggio, con classe di tenuta 8.8, secondo la coppia
raccomandata dal costruttore.
Regolazione del traferro
4
6
Installation
m
5.1 Molla / Pressure spring
6
01
02
03
04
05
06
07
08
09
10
V
R
B2
Instruction and mounting manual Type 08
03
04
05
06
07
08
2
3
09
10
Numero giri della ghiera
Revolutions of the adjustment ring
4
Collegamento elettrico
5
B5
6
Electric Connection
Il magnete viene alimentato in corrente continua c.c.
Per il collegamento in a.c. sono disponibili diversi ponti raddrizzatori
della serie COMBITRON.
Il collegamento di questi alimentatori è descritto nel catalogo COMBITRON.
The magnet coil must be connected to the d.c. voltage. For the connection to the a.c. power supply different rectifiers from the series
COMBITRON are available. The connection of these rectifiers is described in the catalog COMBITRON.
T1
Karl E. Brinkmann GmbH
•
Försterweg 36 - 38
Telefon 0 52 63 / 4 01 - 0
•
Telefax 4 01 - 116
•
E-mail: [email protected]
•
www.keb.de
COMBISTOP 08
Manuale di Istruzioni e montaggio Tipo 08
Raddrizzatori conformi a CE
Uin
comando
Uvmax
275 VAC +0%
AC/DC
450 V
semionda
Uout = 0,45*Uin
IN (45°C) = 1,0A
IN (80°C) = 0,5A
02.91.010-CE07
onda piena
Uout = 0,9*Uin
IN (45°C) = 2,0A
IN (80°C) = 1,0A
02.91.020-CE07
semionda con
protezione EMC
Uout = 0,45*Uin
IN (45°C) = 1,0A
IN (80°C) = 0,5A
02.91.010-CEMV
Uin
Uvmax
Uout
AC
DC
IN (45°C)
Instruction and mounting manual Type 08
CE conform rectifiers
500 VAC +0%
AC/DC
900 V
04.91.010-CE07
600 VAC +0%
AC
1000 V
Non è consentito superare la tensione massima d'alimentazione.
It is not allowed to exceed the maximum input voltage.
720 VAC +0%
AC
1600 V
05.91.010-CE09
06.91.010-CE09
04.91.020-CE07
Uin
switching
Uvmax
Commutazione AC
L1
L2
L3
N
full wave
Uout = 0,9*Uin
IN (45°C) = 2,0A
IN (80°C) = 1,0A
Uin
Uvmax
Uout
AC
DC
IN (45°C)
maximum input voltage
maximum switch-off voltage
DC output voltage
AC side switching
DC side switching
nominal current at stated
temperature
31
➀
V1
W1
U1
V1
W1
U2
V2
W2
U2
V2
U1
U2
Il ponte deve essere fissato prima di essere messo in funzione.
Il cablaggio
➁ non è permesso per il funzionamento dell'inverter.
Per cavi aventi lunghezza superiore a 10 m fra raddrizzatore
e freno è richiesto l'utilizzo di un interruttore separato . In
questo caso la tensione fornita potrebbe non arrivare dal
contatto del motore .
➀
➁
Commutazione DC
U2
Wire jumper must be fastened before putting into operation.
The wiring
eration.
➁ is not permitted for frequency inverter op-
For cable lenghts of more than 10 m between rectifier and
brake the use of a separate switch
is required. In this
case the supply voltage may not be tapped behind the motor contactor
.
➀
➁
DC side Switching
L1
L2
L3
L1
L2
L3
N
➂
➃
C
C
3,5
4
C
U1
V1
W1
U1
V1
W1
W2
U2
V2
W2
U2
V2
U2
U2
La commutazione viene effettuata fra raddrizzatore e magnete. Il raddrizzatore è protetto da picchi di tensione che
possono verificarsi durante la commutazione.
The switching is done between rectifier and magnet. The
rectifier is protected against voltage peaks that occur during
switching.
La frequenza di commutazione è limitata in funzione della
dimensione del freno; far riferimento al catalogo.
Depending on the brake size the switching frequency is limited, please refer to the catalogue.
04.91.010-CE07
02.91.010-CE07
28
25
9
3
3
U1
W2
U1
4
➁
C
38
3,5
L1
L2
L3
C
half wave
Uout = 0,45*Uin
IN (45°C) = 1,0A
IN (80°C) = 0,5A
half wave with
EMC protection
Uout = 0,45*Uin
IN (45°C) = 1,0A
IN (80°C) = 0,5A
tensione max. d'alimentazione
tensione max. di disinserimento
tensione d'uscita DC
commutazione lato AC (corrente alternata)
commutazione lato DC (corrente continua)
corrente nominale alla temperatura
stabilita
AC side Switching
5
46
37
Sezione morsettiera 1,5 mm2
Terminal cross section 1,5 mm2
Contenitore
Contenitore
•
➃
La figura
mostra la commutazione simultanea AC e DC.
Questo tipo di commutazione garantisce tempi brevi di
switching e riduce l'usura del contatto.
➃
Example
shows the simultaneous AC- and DC-side
switching. This switching mode guarantees short switching
times and reduces the contact erosion.
Sezione morsettiera 2,5 mm2
Terminal cross section 2,5 mm2
Housing
Karl E. Brinkmann GmbH
18
7,5
17
Försterweg 36 - 38
•
D - 32683 Barntrup
Housing
Telefon 0 52 63 / 4 01 - 0
•
Telefax 4 01 - 116
•
E-mail: [email protected]
•
www.keb.de

