29/11/16
Esempio di architettura software
Corso di Principi di Progettazione del Software, a.a. 2012/13
29 novembre 2016
Ing. Roberto Vergallo
1
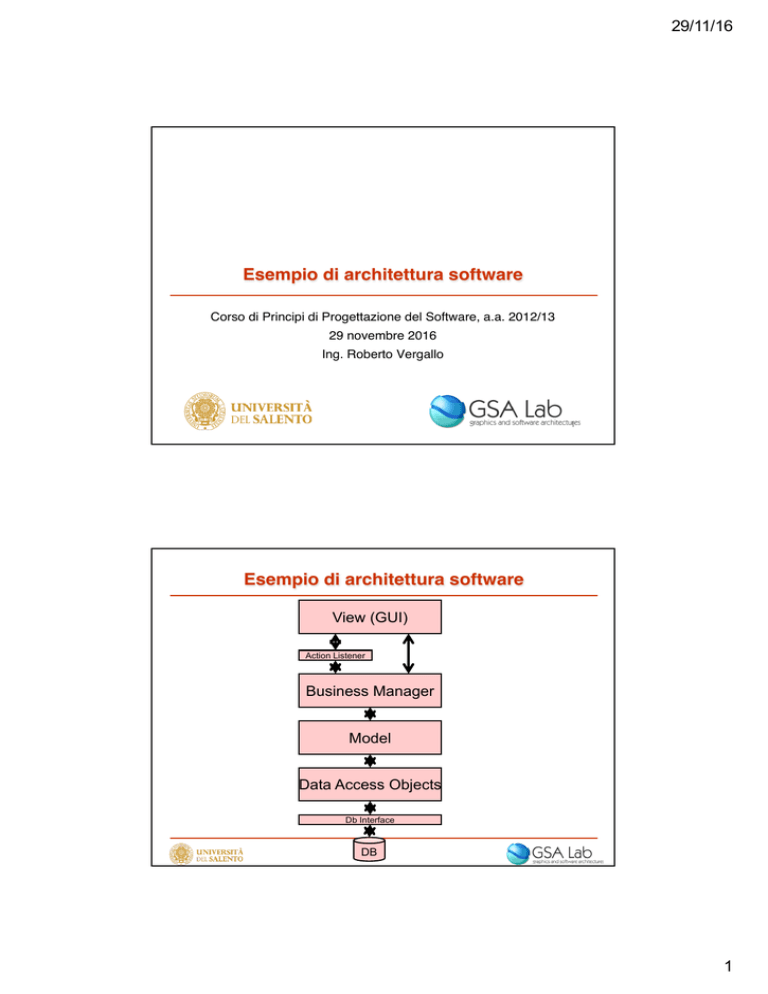
Esempio di architettura software
View (GUI)
Action Listener
Business Manager
Model
Data Access Objects
Db Interface
DB
1
29/11/16
Introduzione all’uso dell’IDE Eclipse per lo
sviluppo di applicazioni in linguaggio Java
Corso di Principi di Progettazione del Software, a.a. 2016/17
29 novembre 2016
Ing. Roberto Vergallo
1
Agenda
Cosa vedremo in questa lezione:
■ Introduzione alla piattaforma Eclipse
– Qualche curiosità su Eclipse
– Interfaccia dell’ambiente di sviluppo
– Creazione di un nuovo progetto
2
1
29/11/16
Agenda
Per questa lezione necessiteremo di Eclipse IDE for Java Developers
“Neon” :
http://www.eclipse.org/
Casi d’esempio: EclipseTutorials: http://eclipsetutorials.sourceforge.net/
Attenzione, il materiale è per Eclipse 3.3!
3
INTRODUZIONE ALLA PIATTAFORMA
ECLIPSE
4
2
29/11/16
Introduzione alla piattaforma Eclipse
■ È un IDE
■ È scritto in Java
■ Deriva da VisualAge di IBM
■ È Free ed Open Source (licenziato sotto EPL)
■ È una piattaforma a componenti (tutto è un plug-in!)
– Diversi package tra cui scegliere in fase di download (Java, Java EE,
C/C++, RCP Development, Ruby, …)
■ È multilinguaggio
■ Centinaia di plug-in disponibili (http://marketplace.eclipse.org/)
■ Ambiente standard “de facto” per lo sviluppo in Java, esistono
vari pacchetti commerciali basati sulla personalizzazione della
piattaforma Eclipse
5
Introduzione alla piattaforma Eclipse (cont.)
Uno sguardo all’interfaccia utente di Eclipse:
■ Perspective
■ Editors
■ Views
■ Manipolazione dell’interfaccia grafica (spostamento, massimizzazione,
minimizzazione delle views)
■ Creazione di un nuovo progetto Java
6
3
29/11/16
Introduzione alla piattaforma Eclipse (cont.)
Vediamo le features di Eclipse per la scrittura di codice:
■ Aggiungere una classe
■ Generazione di metodi get/set
■ Generazione di metodi per overriding
■ Menù Source e Refactor
■ Ctrl + Spazio
■ Avviare il progetto
■ Deploy come JAR (Java ARchive)
7
DEBUGGING DI CODICE JAVA IN ECLIPSE
8
4
29/11/16
Debugging di codice Java in Eclipse
Il debugger è uno strumento vitale per uno sviluppatore
perché:
■ Permette di risparmiare tempo nel trovare errori nella logica
■ Consente di tracciare l’evoluzione di un programma
■ Consente di capire come funziona del codice non scritto da noi
9
Debugging di codice Java in Eclipse (cont.)
Proviamo alcune funzionalità del debugger di Eclipse:
■ La perspective Debug, le viste Breakpoints e Variables
■ Inserimento di un breakpoint
■ Lo stack frame
■ I vari Step, come fermare il debug
■ Variabili: il programma lavora sotto i nostri occhi
■ Oltre le variabili, le Watch Expressions (abilitare in Show Views)
– ad es. “sue.getName()”
■ Java Exception Breakpoint, come fermarsi su una particolare eccezione
■ Sostituzione del codice “a caldo” e cambiamento del valore di una
variabile
■ Breakpoint condizionali ed hit counts
10
5
29/11/16
JDBC
Corso di Principi di Progettazione del Software, a.a. 2012/13
29 novembre 2016
Ing. Roberto Vergallo
1
MySQL DBMS
■ MySQL Community Server
http://www.mysql.it/downloads/mysql/5.1.html
■ MySQL Workbench
http://www.mysql.it/downloads/workbench/
2
1
29/11/16
Java Database Connectivity (JDBC)
■ An interface to communicate with a relational
database
– Allows database agnostic Java code
– Treat database tables/rows/columns as Java objects
■ JDBC driver
– An implementation of the JDBC interface
– Communicates with a particular database
Java app
JDBC
calls
JDBC
JDBC
JDBC
driver
driver
driver
Database
commands
Database
Database
Database
Eclipse JDBC setup
■ Install driver
– Download MySQL JDBC driver from
http://www.mysql.it/products/connector/
– Unzip mysql-connector-xxx.jar
– Add mysql-connector-xxx.jar to Eclipse project
• Project à Properties à Java Build Path à Libraries à Add External
JARs
2
29/11/16
JDBC steps
1.
Connect to database
2.
Query database (or insert/update/delete)
3.
Process results
4.
Close connection to database
1. Connect to database
■ Load JDBC driver
– Class.forName("com.mysql.jdbc.Driver").newInstance();
■ Make connection
– Connection conn = DriverManager.getConnection(url);
■ URL
– Format: “jdbc:<subprotocol>:<subname>”
– jdbc:mysql://127.0.0.1/mydb?user=USER&password=PASSWORD
3
29/11/16
2. Query database
Create statement
a.
–
Statement stmt = conn.createStatement();
–
–
stmt object sends SQL commands to database
Methods
•
executeQuery() for SELECT statements
•
executeUpdate() for INSERT, UPDATE, DELETE,
statements
Send SQL statements
b.
–
stmt.executeQuery( SELECT … );
–
stmt.executeUpdate( INSERT … );
3. Process results
■ Result of a SELECT statement (rows/columns) returned as a
ResultSet object
– ResultSet rs =
stmt.executeQuery("SELECT * FROM users");
■ Step through each row in the result
– rs.next()
■ Get column values in a row
– String userid = rs.getString(“userid”);
– int type = rs.getInt( type );
users table
userid
firstname
lastname
password
type
Bob
Bob
King
cat
0
John
John
Smith
pass
1
4
29/11/16
Print the users table
ResultSet rs = stmt.executeQuery("SELECT * FROM users");
while (rs.next()) {
String userid = rs.getString(1);
String firstname = rs.getString(“firstname”);
String lastname = rs.getString(“lastname”);
String password = rs.getString(4);
int type = rs.getInt(“type”);
System.out.println(userid + ” ” + firstname + ” ” +
lastname + ” ” + password + ” ” + type);
}
users table
userid
firstname
lastname
password
type
Bob
Bob
King
cat
0
John
John
Smith
pass
1
Add a row to the users table
String str =
"INSERT INTO users
VALUES('Bob', 'Bob', 'King',
'cat', 0) ;
// Returns number of rows in table
int rows = stmt.executeUpdate(str);
users table
userid
firstname
lastname
password
type
Bob
Bob
King
cat
0
5
29/11/16
4. Close connection to database
■ Close the ResultSet object
– rs.close();
■ Close the Statement object
– stmt.close();
■ Close the connection
– conn.close();
References
■ JDBC API Documentation
– http://docs.oracle.com/javase/6/docs/technotes/guides/jdbc/ge
tstart/GettingStartedTOC.fm.html
6

