DESCRIZIONE
Il KIT di ricircolo per il modulo ACS 40 E viene fornito separatamente dal modulo, è composto da un circolatore, valvola
a sfera 3/4” M, valvola di non ritorno, sonda PT1000 e il kit tubazioni in rame.
CONTENUTO DELLA CONFEZIONE
Descrizione - KIT di ricircolo con imballo
- Foglio di istruzioni
Q.tà
1
1
AVVERTENZE GENERALI E REGOLE FONDAMENTALI DI SICUREZZA
CONSULTARE ATTENTAMENTE IL MANUALE A CORREDO DEL MODULO SANITARIO PRIMA DI PROCEDERE A QUALSIASI INTERVENTO SULL’APPARECCHIATURA.
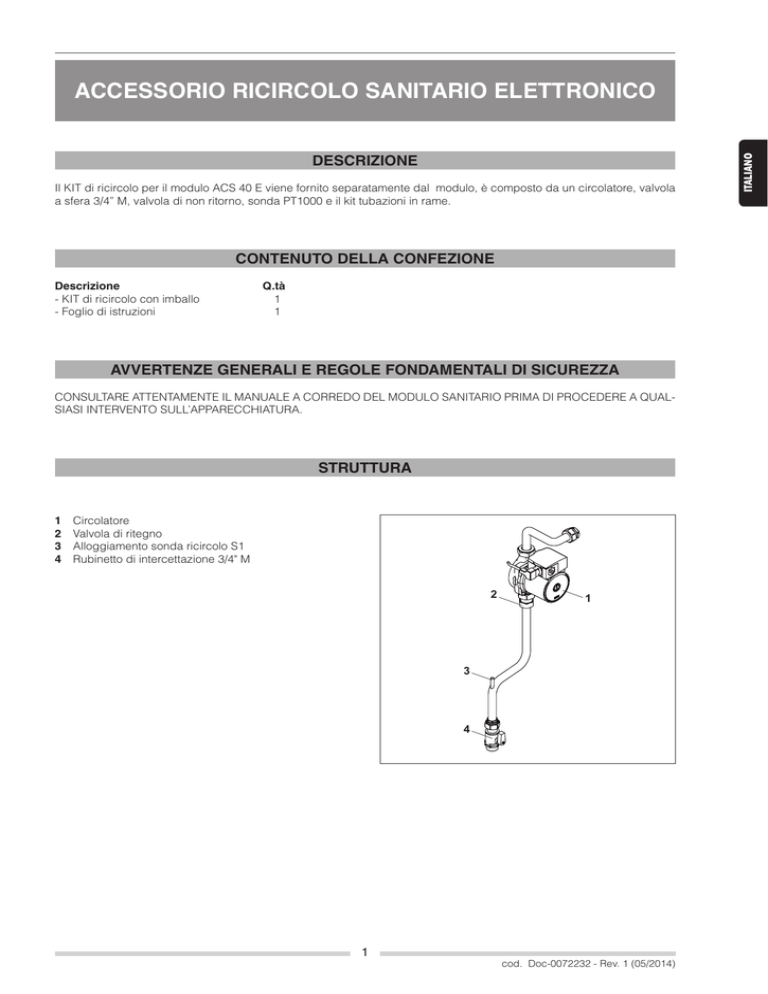
STRUTTURA
1
2
3
4
Circolatore
Valvola di ritegno
Alloggiamento sonda ricircolo S1
Rubinetto di intercettazione 3/4" M
2
1
3
4
1
cod. Doc-0072232 - Rev. 1 (05/2014)
ITALIANO
ACCESSORIO RICIRCOLO SANITARIO ELETTRONICO
CURVE CARATTERISTICHE CIRCOLATORE
3
Prevalenza (m)
2,5
2
1,5
1
0,5
0
0
0,5
1
1,5
Portata (m3/h)
2
2,5
MESSA IN FUNZIONE DEL MODULO CON KIT DI RICIRCOLO
Procedura per il montaggio del kit di ricircolo:
-- Chiudere le valvole a sfera di ingresso AFS (3) e di uscita ACS (4)
-- Svitare e estrarre il tappo 3/4” (1)
-- Inserire il KIT di ricircolo avvitando i componenti e la
calotta a tenuta
-- Inserire la sonda S1 nel posto indicato (2) e collegarla
alla centralina, seguendo lo schema elettrico
-- Mettere in pressione il circuito
-- Controllare la tenuta idraulica del circuito
-- Dare tensione al modulo
-- Impostare nella centralina al menù 6.Funzioni speciali,
nel punto 6.6.1.1 la modalità ricircolo in ON
-- Impostare nella centralina al menù 4.Impostazioni, nel
punto 4.4 i parametri per il funzionamento del ricircolo.
(vedi manuale a corredo del modulo per le impostazioni
di default)
-- Verificare il corretto funzionamento.
1
2
3
2
4
La connessione dei relè cambia a seconda delle funzioni aggiuntive selezionate.
La polarità delle sonde è a scelta libera, il collegamento del comune va fatto nella morsettiera inferiore (-).
Effettuare la connessione della sonda S1 nella parte sinistra della morsettiera.
Effettuare la connessione del circolatore alla centralina elettronica nella parte destra della morsettiera.
LATO SONDA
max. 12V
LATO LINEE
230 VAC
CAN CAN
+
S6
V2
V1
S5
VFS2
S4
VFS1
S3
S2
S1
-
Bassa tensione max. 12 VAC / DC
Terminale:
Connessione per:
S1
Ricircolo
S2
Acqua fredda
S3
Portata primario (opz.)
S4
Accumulo alto
S5
V1
PWM segnale pompa primario
V2
0-10V/PWM segnale (opz.)
S6
Ritorno primario (opz.)
prelievo acqua fredda
VFS2
opzionale
PELV
R3
R3I
R2
R1
L
N
Linee in tensione 230 VAC 50-60 Hz
Terminale:
Connessione per:
L
Linea principale fase L
N
Linea neutra fase N
R1
Pompa primario
R2
Relè 2 (ricircolo)
R3
Relè 3 (normalm. aperto)
R3I
Relè 3 (normalm. aperto)
La linea di protezione PE deve essere connessa alla
morsettiera metallica PE!
3
ITALIANO
SCHEMA ELETTRICO
ELECTRONIC DHW RECIRCULATION KIT
DESCRIPTION
The electronic recirculation kit for ACS 40 E DHW mixers is supplied separately from the mixer itself. The kit consists of a
pump, a 3/4” M ball valve, a non-return valve, a PT1000 temperature sensor and a copper pipe.
CONTENTS OF KIT
Qty
1
1
ENGLISH
Description - Recirculation pump with packing - Instruction manual GENERAL SAFETY INFORMATION AND PRECAUTIONS
READ THE MANUAL SUPPLIED WITH THE DHW MIXER THOROUGHLY BEFORE PERFORMING ANY WORK ON IT.
MAIN COMPONENTS
1
2
3
4
Pump
Non-return valve
Socket for S1 recirculation sensor
3/4" M shut-off valve
2
3
4
5
1
CHARACTERISTIC CURVES FOR PUMP
3
3/h)
Prevalenza
Flow
rate (m(m)
2,5
2
1,5
1
0,5
0
0
0,5
1
1,5
33
Portata
(m
/h)
Flow rate (m /h)
2
2,5
PUTTING INTO SERVICE
Proceed as follows to install the recirculation kit.
-- Close the cold water inlet ball valve (3) and the hot water outlet ball valve (4).
-- Unscrew and remove the 3/4” plug (1).
-- Install the recirculation accessory. Screw on and fittings
and tighten the watertight fitting.
-- Insert temperature sensor S1 in its socket (2) and connect it to the controller as shown in the electric wiring
diagram.
-- Fill and pressurise the circuit.
-- Check that the circuit is watertight.
-- Switch on the DHW mixer.
-- Go to the controller menu 6. “Special functions”, and
set recirculation ON in parameter 6.6.1.1.
-- Go to the controller menu 4. “Settings”, and in parameter 4.4 set the required recirculation functioning parameters. (See the manual supplied with the DHW mixer
for default settings.)
-- Check the correct functioning of the system.
1
2
3
6
4
ELECTRICAL WIRING DIAGRAM
Relay connections vary depending on what additional functions are selected.
The polarity of the temperature sensors is irrelevant. The common wire should be connected to the bottom (-) terminal strip.
Connect sensor S1 to the terminals on the left.
Connect the pump to the electronic controller terminals on the right.
SENSOR SIDE
max. 12V
POWER SIDE
230 VAC
CAN CAN
S6
V2
V1
S5
S4
VFS1
S3
S2
S1
-
PELV
R3
R3I
R2
R1
L
N
ENGLISH
+
VFS2
Max. low voltage 12 VAC / DC
Terminal:
Connection for:
S1
Recirculation
S2
Cold water sensor
S3
Primary flow rate (optional)
S4
Storage cylinder top sensor
S5
V1
Primary pump PWM signal
V2
0-10V/PWM signal (optional)
S6
Primary return (optional)
Cold water draw-off sensor
VFS2
optional
Power terminals 230 VAC 50-60 Hz
Terminal:
Connection for:
L
Mains power, phase L
N
Mains power, N
R1
Primary circuit pump
R2
Relay 2 (recirculation)
R3
Relay 3 (normally open)
R3I
Relay 3 (normally open)
The earth wire must be connected to the metallic PE
terminal!
7

